open ~/.settings.xml: no such file or directory open failed main.ReadFile ~/go/src/github.com/ethancai/goErrorHandlingSample/sample4/main.go:15 main.ReadConfig ~/go/src/github.com/ethancai/goErrorHandlingSample/sample4/main.go:27 main.main ~/go/src/github.com/ethancai/goErrorHandlingSample/sample4/main.go:32 runtime.main /usr/local/Cellar/go/1.9.2/libexec/src/runtime/proc.go:195 runtime.goexit /usr/local/Cellar/go/1.9.2/libexec/src/runtime/asm_amd64.s:2337 could not read config main.ReadConfig ~/go/src/github.com/ethancai/goErrorHandlingSample/sample4/main.go:28 main.main ~/go/src/github.com/ethancai/goErrorHandlingSample/sample4/main.go:32 runtime.main /usr/local/Cellar/go/1.9.2/libexec/src/runtime/proc.go:195 runtime.goexit /usr/local/Cellar/go/1.9.2/libexec/src/runtime/asm_amd64.s:2337 exit status 1
// New returns an error with the supplied message. // New also records the stack trace at the point it was called. funcNew(message string)error
// Errorf formats according to a format specifier and returns the string // as a value that satisfies error. // Errorf also records the stack trace at the point it was called. funcErrorf(format string, args ...interface{})error
// WithStack annotates err with a stack trace at the point WithStack was called. // If err is nil, WithStack returns nil. funcWithStack(err error)error
// Wrap returns an error annotating err with a stack trace // at the point Wrap is called, and the supplied message. // If err is nil, Wrap returns nil. funcWrap(err error, message string)error
// Wrapf returns an error annotating err with a stack trace // at the point Wrapf is called, and the format specifier. // If err is nil, Wrapf returns nil. funcWrapf(err error, format string, args ...interface{})error
// WithMessage annotates err with a new message. // If err is nil, WithMessage returns nil. funcWithMessage(err error, message string)error
// WithMessagef annotates err with the format specifier. // If err is nil, WithMessagef returns nil. funcWithMessagef(err error, format string, args ...interface{})error
// Cause returns the underlying cause of the error, if possible. // An error value has a cause if it implements the following // interface: // // type causer interface { // Cause() error // } // // If the error does not implement Cause, the original error will // be returned. If the error is nil, nil will be returned without further // investigation. funcCause(err error)error
// 以下代码在 go113.go 中
// Is reports whether any error in err's chain matches target. // // The chain consists of err itself followed by the sequence of errors obtained by // repeatedly calling Unwrap. // // An error is considered to match a target if it is equal to that target or if // it implements a method Is(error) bool such that Is(target) returns true. funcIs(err, target error)bool
// As finds the first error in err's chain that matches target, and if so, sets // target to that error value and returns true. // // The chain consists of err itself followed by the sequence of errors obtained by // repeatedly calling Unwrap. // // An error matches target if the error's concrete value is assignable to the value // pointed to by target, or if the error has a method As(interface{}) bool such that // As(target) returns true. In the latter case, the As method is responsible for // setting target. // // As will panic if target is not a non-nil pointer to either a type that implements // error, or to any interface type. As returns false if err is nil. funcAs(err error, target interface{})bool
// Unwrap returns the result of calling the Unwrap method on err, if err's // type contains an Unwrap method returning error. // Otherwise, Unwrap returns nil. funcUnwrap(err error)error
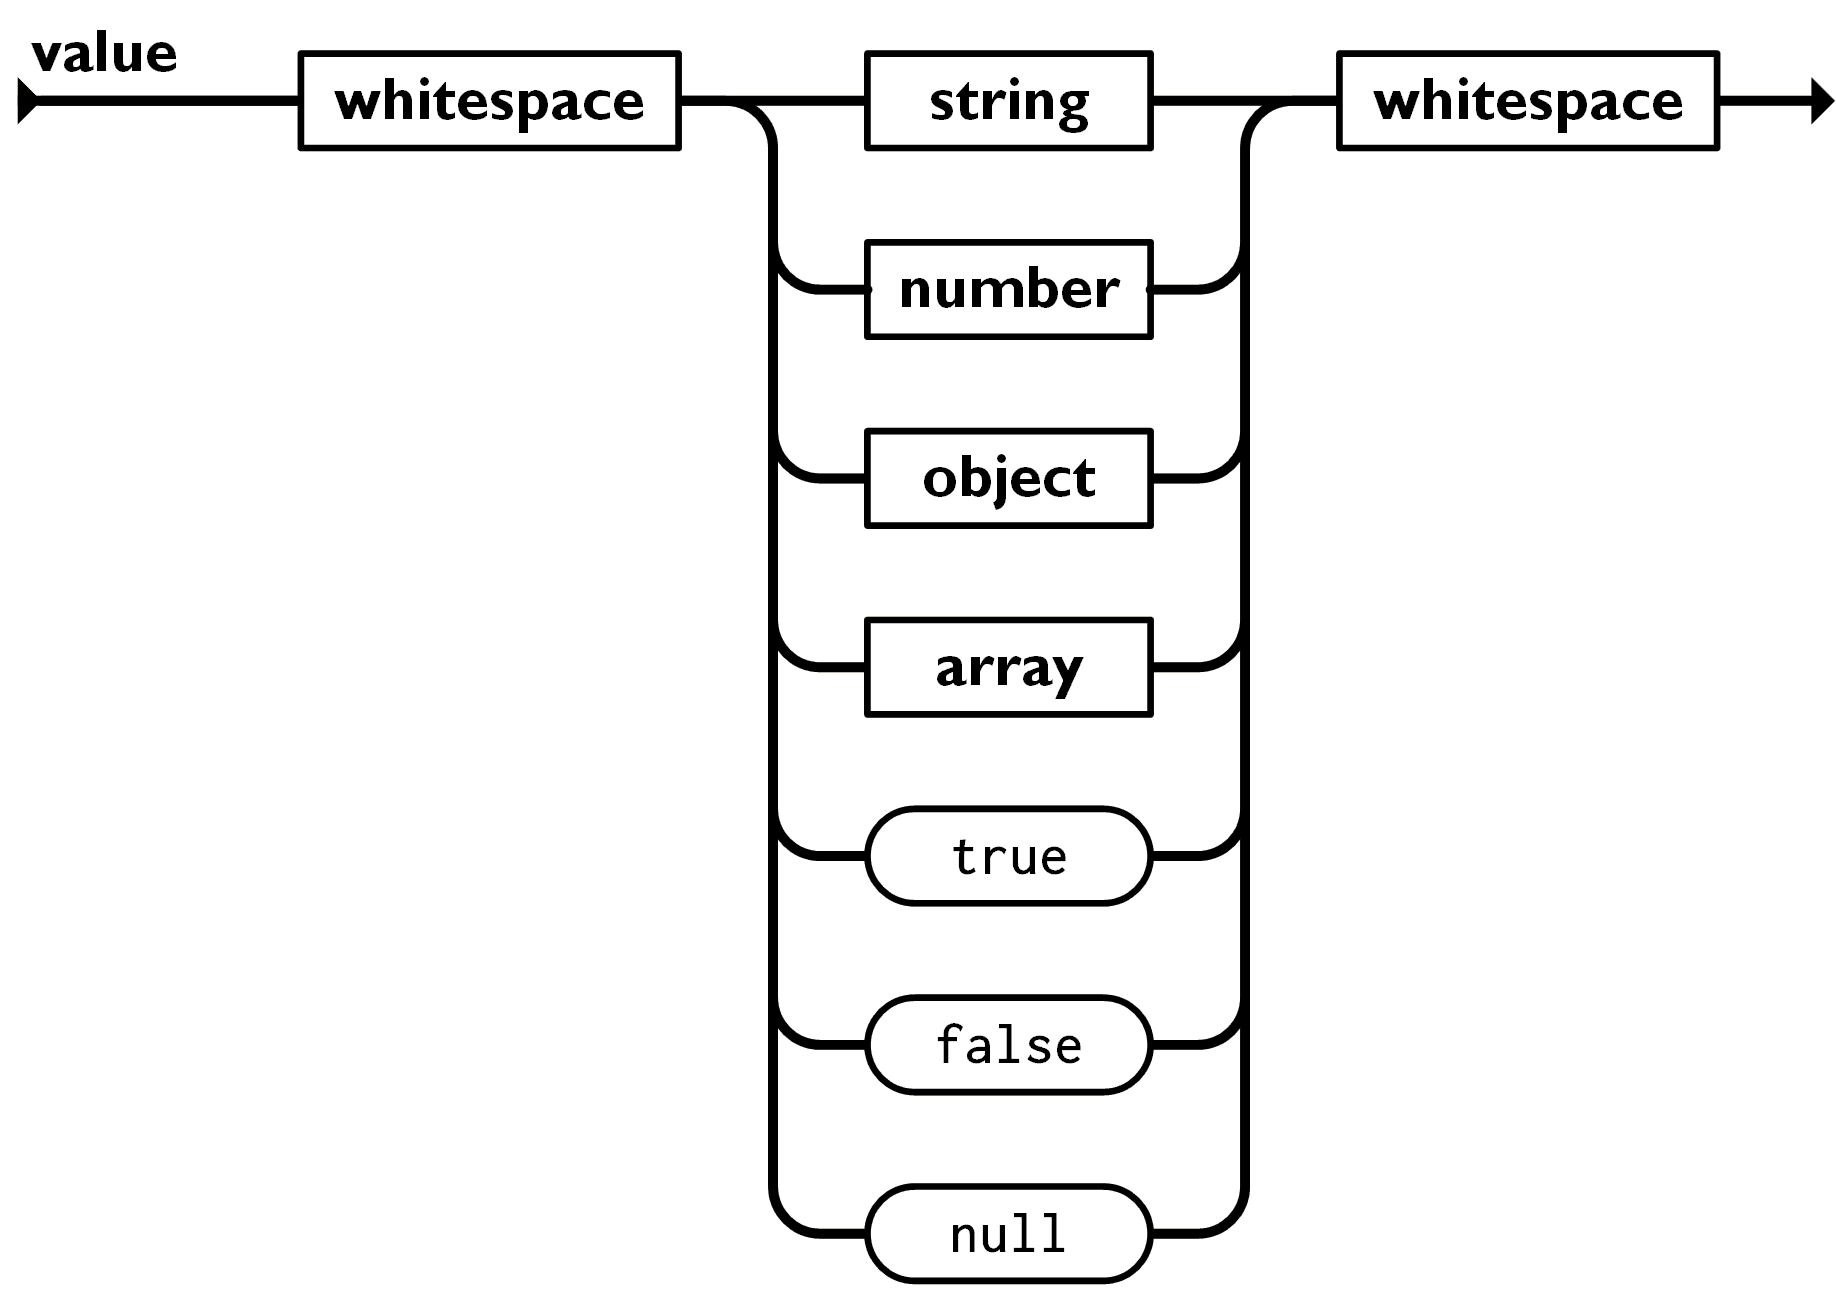
Struct values encode as JSON objects. Each exported struct field becomes a member of the object unless
the field’s tag is “-“, or
the field is empty and its tag specifies the “omitempty” option.
The empty values are false, 0, any nil pointer or interface value, and any array, slice, map, or string of length zero. The object’s default key string is the struct field name but can be specified in the struct field’s tag value. The “json” key in the struct field’s tag value is the key name, followed by an optional comma and options. Examples:
1 2 3 4 5 6 7 8 9 10 11 12 13 14 15
// Field is ignored by this package. Field int`json:"-"`
// Field appears in JSON as key "myName". Field int`json:"myName"`
// Field appears in JSON as key "myName" and // the field is omitted from the object if its value is empty, // as defined above. Field int`json:"myName,omitempty"`
// Field appears in JSON as key "Field" (the default), but // the field is skipped if empty. // Note the leading comma. Field int`json:",omitempty"`
decoder := json.NewDecoder(strings.NewReader(jsonStream)) decoder.UseNumber() // UseNumber causes the Decoder to unmarshal a number into an interface{} as a Number instead of as a float64.
var user interface{} if err := decoder.Decode(&user); err != nil { fmt.Println("error:", err) return }
type Time struct {
    // sec gives the number of seconds elapsed since
    // January 1, year 1 00:00:00 UTC.
    sec int64

    // nsec specifies a non-negative nanosecond
    // offset within the second named by Seconds.
    // It must be in the range [0, 999999999].
    nsec int32

    // loc specifies the Location that should be used to
    // determine the minute, hour, month, day, and year
    // that correspond to this Time.
    // Only the zero Time has a nil Location.
    // In that case it is interpreted to mean UTC.
    loc *Location
}
funcmain() { type Fn func(int)int id := func(x int)int { return x } var zeroFn Fn log.Println(reflect.TypeOf(id).AssignableTo(reflect.TypeOf(zeroFn)))
type MyInt int mi := 1 log.Println(reflect.TypeOf(2).AssignableTo(reflect.TypeOf(mi)))
type S1 struct { name string } type S2 S1
s1 := S1{ name: "ethan", } s2 := S2{ name: "ethan", } // s2 = s1 // if uncomment this line, will report "cannot use s1 (type S1) as type S2 in assignment" when compile log.Println(reflect.TypeOf(s1).AssignableTo(reflect.TypeOf(s2))) }
type SuiteTester struct { // Include our basic suite logic. Suite
// Other properties propertyN string }
// The SetupSuite method will be run by testify once, at the very // start of the testing suite, before any tests are run. func(suite *SuiteTester) SetupSuite() { // ... }
// The TearDownSuite method will be run by testify once, at the very // end of the testing suite, after all tests have been run. func(suite *SuiteTester) TearDownSuite() { // ... }
// The SetupTest method will be run before every test in the suite. func(suite *SuiteTester) SetupTest() { // ... }
// The TearDownTest method will be run after every test in the suite. func(suite *SuiteTester) TearDownTest() { // ... }
// a test method func(suite *SuiteTester) TestOne() { // ... }
// another test method func(suite *SuiteTester) TestTwo() { // ... }
// TestRunSuite will be run by the 'go test' command, so within it, we // can run our suite using the Run(*testing.T, TestingSuite) function. funcTestRunSuite(t *testing.T) { suiteTester := new(SuiteTester) Run(t, suiteTester) }
options *Options seachLogger *Logger clickLogger *Logger streamNames []string// save the created AWS Kinesis Streams, which will be removed in TearDownSuite() }
// The SetupSuite method will be run by testify once, at the very // start of the testing suite, before any tests are run. func(s *WriteLogSuiteTester) SetupSuite() {
for { // waiting created stream's status to be active time.Sleep(1 * time.Second) resp1, err1 := s.seachLogger.kinesis.DescribeStream(s.seachLogger.streamName) s.Nil(err1)
// The TearDownSuite method will be run by testify once, at the very // end of the testing suite, after all tests have been run. func(s *WriteLogSuiteTester) TearDownSuite() { if s.streamNames == nil || len(s.streamNames) == 0 { return }
for _, streamName := range s.streamNames { err := s.seachLogger.kinesis.DeleteStream(streamName) s.Nil(err) } }
func(s *WriteLogSuiteTester) TestWriteLog() { deferfunc() { // Recover if panicking to make sure TearDownSuite will be executed if r := recover(); r != nil { s.Fail(fmt.Sprint(r)) } }()